How to Make a Sourdough Starter
Although creating a sourdough starter from scratch may seem daunting, it’s actually one of the most organic and satisfying culinary endeavors you can undertake. You may make a living culture that will enable you to bake delicious, naturally leavened bread at home—without the use of commercial yeast—with just flour, water, time, and patience.
This tutorial will take you step-by-step through the process of making a sourdough starter, explain what happens at each step, help you steer clear of frequent pitfalls, and teach you how to take long-term care of your starter.
What Is a Sourdough Starter?
A natural fermentation culture created with flour and water is called a sourdough starter. Beneficial bacteria and naturally occurring wild yeast start to thrive when these two items are combined and allowed to sit at room temperature. This mixture eventually gets active enough to raise bread dough by itself.
A sourdough starter is alive, in contrast to store-bought yeast. It requires consistent care and feeding, but in exchange, it makes bread with:
- Better flavor
- Longer shelf life
- Improved texture
- Easier digestion for many people
Why Make Your Own Sourdough Starter?
There are various benefits of creating your own starter from scratch:
- Commercial yeast is not necessary.
- It is practically free.
- The ingredients are under your control.
- You establish a robust wild yeast colony in your area.
- It enhances your comprehension of preparing bread.
Additionally, many bakers find the process to be soothing and fulfilling. It’s like making something genuinely living to see a beginning develop and evolve every day.
What You Need to Get Started:
You only need a few basic items:
1. Ingredients:
- Water (filtered or non-chlorinated
- Flour (unbleached all-purpose or whole wheat)
2. Tools:
- A container or jar made of glass
- A spatula or spoon
- A kitchen scale (useful but unnecessary)
- A permeable covering, such as a fabric or a loose-fitting lid
That’s all. No extra equipment is needed.
Best Flour for a Sourdough Starter:
Many varieties of flour can be used to generate a starting, although some are more effective than others.
Whole wheat flour: Excellent for beginning
Rye flour: ferments rapidly and is very active.
All-purpose flour without bleaching: Excellent for upkeep
Point: For the first few days, many novices use whole wheat flour; once the starter is active, they move to all-purpose flour.
Water Matters More Than You Think:
Fermentation can be slowed or stopped by chlorine-contaminated tap water. If at all possible:
- Make use of filtered water
- Alternatively, wait 12 to 24 hours before utilizing exposed tap water.
Fact: The ideal water temperature is room temperature.
Day-by-Day: How to Make a Sourdough Starter
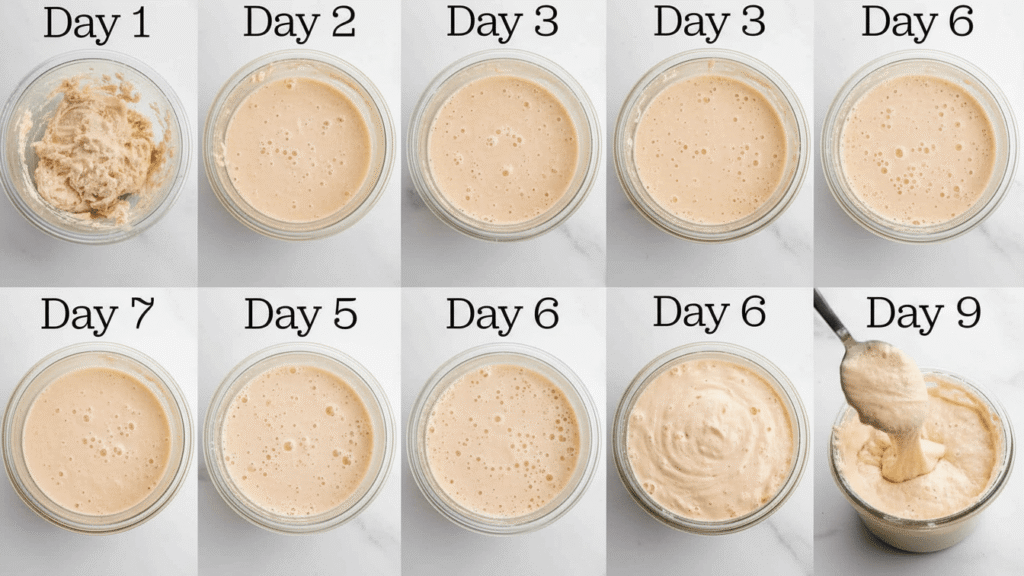
Day 1: Create the Base
- Establish the Base
- In a sanitized jar, combine: Half a cup of flour and ¼ cup of water
- Stir until there is no more dry flour. Like pancake batter, the mixture should be thick.
- Leave the jar at room temperature (around 22–26°C/72–78°F) with a loose lid.
What to expect: Not too dramatic yet. All you’re doing is adding water and flour to the atmosphere.
Day 2: First Signs of Life (Maybe)
- There can be a few tiny bubbles or a somewhat unpleasant odor. It’s usual to see nothing at all.
- After discarding roughly half of the mixture, add half a cup of flour and ¼ cup of water
- After stirring and covering, let it rest once more.
Day 3: Activity Increases
You’ll probably have noticed by now:
- Additional bubbles
- A slightly disagreeable or sour odor
This phase may be perplexing. Many novices believe their starter has gone bad, but it hasn’t. Early germs that will shortly balance out are the source of this odor.
Refeed the starter:
- Throw away half
- Add half a cup of flour.
- Pour in ¼ cup of water.
Day 4–5: Growth and Consistency
Your starter should now:
- Regularly bubble
- After eating, start getting up.
- Smell more delightfully sour
Suggestion: Give it food once every twenty-four hours. You can feed it twice a day if it appears to be highly active. The population of wild yeast starts to stabilize at this point.
Day 6–7: Starter Becomes Active
After the first week is over, a healthy starter will:
- Within four to six hours of eating, they double in size.
- possess a fresh, slightly tart scent
- Display bubbles all over, not just on the surface.
Your sourdough starter is now prepared for baking.
How to Know Your Starter Is Ready?
Following are the sign:
- After feeding, it constantly doubles.
- It appears bouncy and airy.
- Instead of smelling horrible, it smells delightfully sour.
Optional Float Test: A tiny spoonful of starter should be dropped into the water. It is ready and full of gas if it floats. It can require extra time or feeding if it sinks.
Feeding Your Sourdough Starter:
Feeding refers to adding fresh flour and water to the starter.
A straightforward feeding ratio:
- Throw away half
- Add water and flour in equal weight proportions.
When use cups:
- Half a cup of flour
- ¼ cup of water
Suggestion: Feed once a week if kept in the refrigerator, or once a day at room temperature.
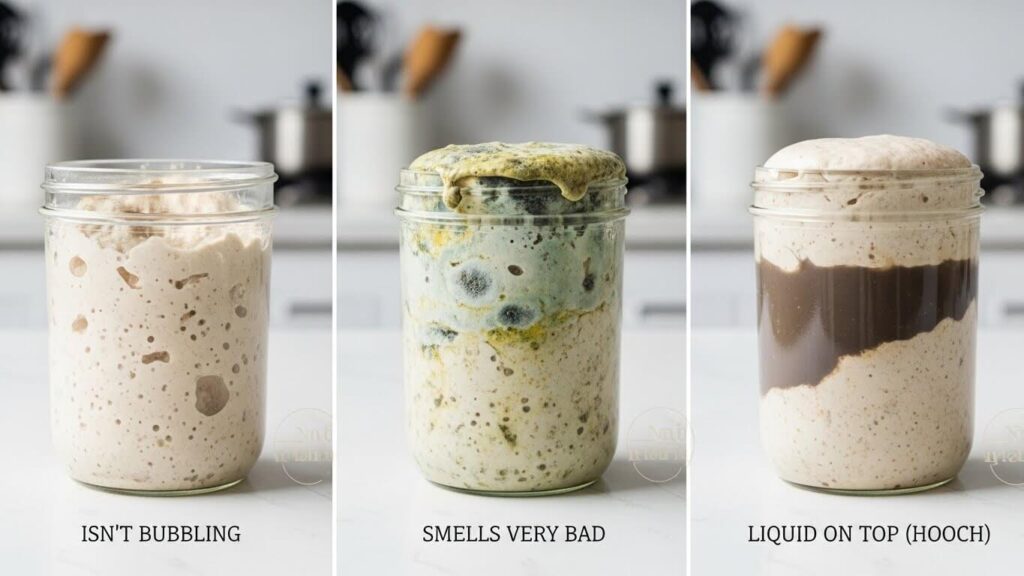
Common Problems and How to Fix Them
1. My Starter Isn’t Bubbling:
- If the room is too cold, move it somewhere warmer.
- Use filtered water because it contains chlorine.
- If the flour is excessively refined, switch to whole wheat for a few meals.
2. It Smells Very Bad:
Strong odors are typical in the early stages. Feed more often if the scent doesn’t get better after days five or six.
3. Liquid on Top (Hooch):
Your starting is hungry if the liquid is black. Pour it out or stir it in, then feed.
Can You Kill a Sourdough Starter?
Yes, but it’s more difficult than you may imagine. Typically, a starter only perishes if:
- For weeks, it is not fed at room temperature.
- It’s too hot.
- It is tainted.
Surprisingly resilient are the majority of beginnings.
How to Store Your Starter?
1. At Room Temperature:
- Best if baking often
- Feed daily
2. In the Refrigerator:
- Once a week, feed
- Before baking, remove and rehydrate.
Fact: The starter is kept alive while fermentation is slowed down by cold storage.
Using Your Starter for Baking:
Your starter can be used for the following once it is active:
- Sourdough bread
- Pancakes and waffles
- Crackers
- Pizza dough
- Flatbreads
Suggestion: For optimal results, always feed your starter before baking.
Discard: Waste or Opportunity?
Maintaining a starting involves discarding, but it doesn’t have to be thrown away. You can use starter discard in:
- Pancakes
- Muffins
- Flatbreads
- Crackers
This results in a more cost-effective and pleasurable process.
Can I use tap water for a sourdough starter?
Yes, although for optimal fermentation, filtered or non-chlorinated water is advised.
Can I bake with a new sourdough starter?
Yes, it is ready for baking as soon as it gets active and consistently doubles.
Should I keep my sourdough starter covered?
Indeed, it should be covered loosely to promote airflow and avoid contamination.
How do I know my sourdough starter is ready to use?
When a starting doubles in size four to six hours after feeding, it’s ready.
Final Thoughts:
Making a sourdough starter requires more patience than precision. Every beginning has a unique personality, and every kitchen is unique. They all reward consistency and care, yet some grow quickly and others take their time.
Once established, your starter can become a dependable kitchen partner for years or even decades. You can make something vibrant, practical, and incredibly fulfilling with simply flour, water, and time.